引入Activiti配置文件activiti.cfg.xml
发布时间:『 2016-03-31 11:06』 博客类别:activiti
前面我们用代码实现了生成25张activiti表,今天我们用Activiti提供的activiti.cfg.xml配置文件来简化实现前面的功能;
官方文档参考地址:http://activiti.org/userguide/index.html#configuration
我们先在src/test/resources下创建一个xml文件 名字是:activiti.cfg.xml
然后我们从官方文档贴下参考的xml代码:
<beans xmlns="http://www.springframework.org/schema/beans"
       xmlns:xsi="http://www.w3.org/2001/XMLSchema-instance"
       xsi:schemaLocation="http://www.springframework.org/schema/beans   http://www.springframework.org/schema/beans/spring-beans.xsd">

  <bean id="processEngineConfiguration" class="org.activiti.engine.impl.cfg.StandaloneProcessEngineConfiguration">

    <property name="jdbcUrl" value="jdbc:h2:mem:activiti;DB_CLOSE_DELAY=1000" />
    <property name="jdbcDriver" value="org.h2.Driver" />
    <property name="jdbcUsername" value="sa" />
    <property name="jdbcPassword" value="" />

    <property name="databaseSchemaUpdate" value="true" />

    <property name="jobExecutorActivate" value="false" />
    <property name="asyncExecutorEnabled" value="true" />
    <property name="asyncExecutorActivate" value="false" />

    <property name="mailServerHost" value="mail.my-corp.com" />
    <property name="mailServerPort" value="5025" />
  </bean>

</beans>
这里的话,我们要根据我们的项目 修改jdbcUrl jdbcDriver jdbcUsername jdbcPassword 当然还有下面的配置我们可以去掉一些 后面会降到这些配置的用途;
修改完后的xml如下:
<?xml version="1.0" encoding="UTF-8"?>
<beans xmlns="http://www.springframework.org/schema/beans"
       xmlns:xsi="http://www.w3.org/2001/XMLSchema-instance"
       xsi:schemaLocation="http://www.springframework.org/schema/beans   http://www.springframework.org/schema/beans/spring-beans.xsd">

  <bean id="processEngineConfiguration" class="org.activiti.engine.impl.cfg.StandaloneProcessEngineConfiguration">

    <property name="jdbcUrl" value="jdbc:mysql://localhost:3306/db_activiti" />
    <property name="jdbcDriver" value="com.mysql.jdbc.Driver" />
    <property name="jdbcUsername" value="root" />
    <property name="jdbcPassword" value="123456" />

    <property name="databaseSchemaUpdate" value="true" />

  </bean>

</beans>
接下来我们就是要通过代码来读取配置文件,然后获取工作流引擎实例:
代码如下:
/**
 * 使用xml配置 简化
 */
@Test
public void testCreateTableWithXml(){
	// 引擎配置
	ProcessEngineConfiguration pec=ProcessEngineConfiguration.createProcessEngineConfigurationFromResource("activiti.cfg.xml");
	// 获取流程引擎对象
	ProcessEngine processEngine=pec.buildProcessEngine();
}
然后我们测试的时候 先把前面db_activiti数据下的表 全部删除;
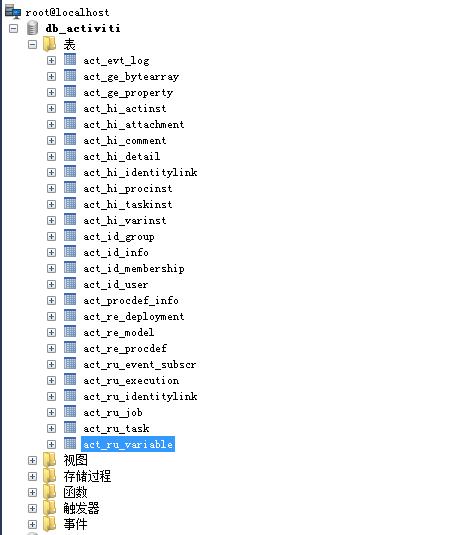
然后运行上面的测试类,我们会发现 表自动生成了:

表依然是前面的25张表;
我们会发现,使用xml配置会简化很多东西。。
完整代码打包下载:http://pan.baidu.com/s/1nuSJ3kd
上一篇:Activiti的25张表
下一篇:初识Activiti流程设计工具


Java1234_小锋
(知识改变命运,技术改变世界)
- Java核心基础(145)
- QQ第三方登录(6)
- mybatis-plus(20)
- Mycat(30)
- Layui(2)
- Mysql(2)
- Docker(35)
- Dubbo(7)
- 007项目(0)
- SVN(22)
- NodeJs(1)
- IDEA(24)
- SpringBoot(11)
- 微信扫码登录(4)
- Git(50)
- SpringCloud(33)
- Tomcat(6)
- 支付宝接口(3)
- jsoup(6)
- shiro(1)
- Nginx(24)
- Vue.js(50)
- 活动(20)
- hibernate(1)
- EhCache缓存框架(4)
- webservice(10)
- CAS单点登录(7)
- elasticsearch(31)
- Redis(17)
- maven(6)
- log4j日志(8)
- IT之路(26)
- activiti(26)
- centos(25)
- 随心生活(19)
- java爬虫技术(14)
- 网站SEO(2)
- httpclient(7)
- htmlunit(10)
- 2022年12月(1)
- 2021年10月(1)
- 2021年02月(3)
- 2020年11月(3)
- 2020年10月(4)
- 2020年09月(7)
- 2020年08月(18)
- 2020年07月(21)
- 2020年06月(37)
- 2020年05月(17)
- 2020年04月(12)
- 2020年03月(10)
- 2020年02月(14)
- 2020年01月(12)
- 2019年12月(15)
- 2019年11月(27)
- 2019年10月(5)
- 2019年09月(1)
- 2019年08月(4)
- 2019年07月(28)
- 2019年06月(16)
- 2019年05月(4)
- 2019年04月(3)
- 2019年03月(2)
- 2019年02月(7)
- 2019年01月(20)
- 2018年12月(2)
- 2018年11月(5)
- 2018年10月(30)
- 2018年09月(11)
- 2018年08月(5)
- 2018年07月(9)
- 2018年06月(4)
- 2018年05月(4)
- 2018年04月(3)
- 2018年03月(7)
- 2018年02月(6)
- 2018年01月(13)
- 2017年12月(3)
- 2017年11月(10)
- 2017年10月(1)
- 2017年09月(9)
- 2017年08月(12)
- 2017年07月(19)
- 2017年06月(21)
- 2017年05月(1)
- 2017年04月(12)
- 2017年03月(13)
- 2017年02月(12)
- 2017年01月(14)
- 2016年12月(8)
- 2016年11月(25)
- 2016年10月(16)
- 2016年09月(13)
- 2016年08月(20)
- 2016年07月(12)
- 2016年06月(36)
- 2016年05月(10)
- 2016年04月(19)
- 2016年03月(14)
- 2016年02月(23)
- 2016年01月(1)
Powered by Java1234 V3.0
Copyright © 2012-2016 Java知识分享网 版权所有