
SpringBoot项目属性配置
前面我们讲解了SpringBoot HelloWorld实现
今天具体来讲解上那个application.properties项目配置文件
打开是空白 里面可以配置项目,所以配置项目我们 alt+/ 都能提示出来
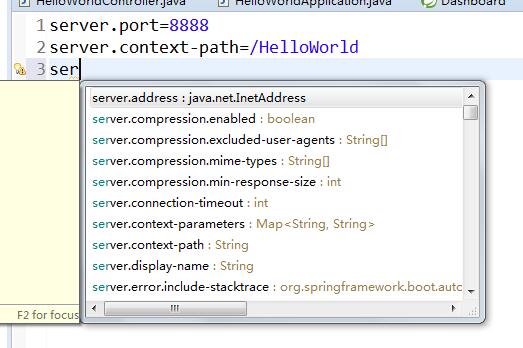
上一讲tomcat默认端口8080 默认路径是根目录/
我们现在改成 端口8080 以及上下文路径/HelloWorld
改完后保存,启动HelloWorldApplication类
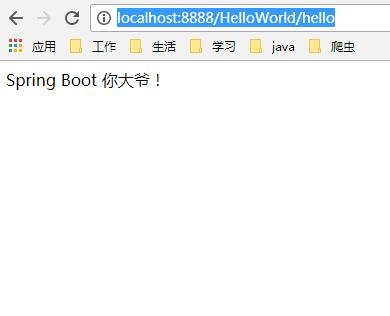
页面输入:http://localhost:8888/HelloWorld/hello
结果出来了
SpringBoot支持自定义属性
我们在application.properties中加一个helloWorld属性,属性值spring Boot大爷你好
server.port=8888
server.context-path=/HelloWorld
helloWorld=spring Boot\u5927\u7237\u4F60\u597D
当然对中文字节编码处理了
package com.java1234;

import org.springframework.beans.factory.annotation.Value;
import org.springframework.web.bind.annotation.RequestMapping;
import org.springframework.web.bind.annotation.RestController;

@RestController
public class HelloWorldController {

	@Value("${helloWorld}")
	private String helloWorld;

	@RequestMapping("/hello")
	public String say(){
		return helloWorld;
	}
}
页面里 我们定义然后配置一个属性值,调用请求,可以直接返回配置的值。
这个是一个很好的功能,比较方便;
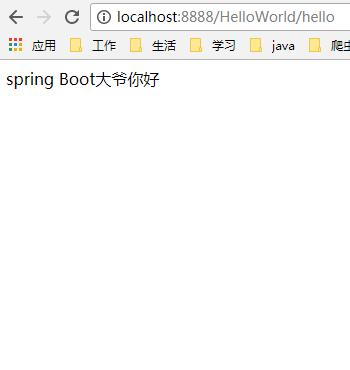
我们重启HelloWorldApplication类,
页面输入:http://localhost:8888/HelloWorld/hello
显示:
假如我们要配置一个类别下的多个属性,
比如mysql的jdbc连接配置
mysql.jdbcName=com.mysql.jdbc.Driver
mysql.dbUrl=jdbc:mysql://localhost:3306/db_diary
mysql.userName=root
mysql.password=123456
我们贴到application.properties
然后按照前面的方案,我们在Controller里写四个属性;
package com.java1234;

import org.springframework.beans.factory.annotation.Value;
import org.springframework.web.bind.annotation.RequestMapping;
import org.springframework.web.bind.annotation.RestController;

@RestController
public class HelloWorldController {

	@Value("${helloWorld}")
	private String helloWorld;

	@Value("${mysql.jdbcName}")
	private String jdbcName;

	@Value("${mysql.dbUrl}")
	private String dbUrl;

	@Value("${mysql.userName}")
	private String userName;

	@Value("${mysql.password}")
	private String password;

	@RequestMapping("/hello")
	public String say(){
		return helloWorld;
	}

	@RequestMapping("/showJdbc")
	public String showJdbc(){
		return "mysql.jdbcName:"+jdbcName+"<br/>"
			  +"mysql.dbUrl:"+dbUrl+"<br/>"
			  +"mysql.userName:"+userName+"<br/>"
			  +"mysql.password:"+password;

	}
}
重启启动类,
页面输入:http://localhost:8888/HelloWorld/showJdbc
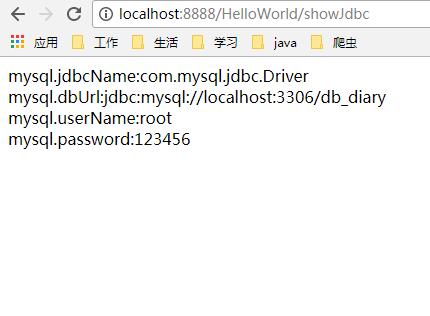
上面那种 假如属性很多 要写一大串 假如多个地方使用 每个地方都得写这么多 不可取
下面我们介绍ConfigurationProperties配置方式
新建一个MysqlProperties类 把所有属性都配置上去
package com.java1234;

import org.springframework.boot.context.properties.ConfigurationProperties;
import org.springframework.stereotype.Component;

/**
 * Mysql属性配置文件
 * @author user
 *
 */
@Component
@ConfigurationProperties(prefix="msyql")
public class MysqlProperties {

	private String jdbcName;

	private String dbUrl;

	private String userName;

	private String password;

	public String getJdbcName() {
		return jdbcName;
	}

	public void setJdbcName(String jdbcName) {
		this.jdbcName = jdbcName;
	}

	public String getDbUrl() {
		return dbUrl;
	}

	public void setDbUrl(String dbUrl) {
		this.dbUrl = dbUrl;
	}

	public String getUserName() {
		return userName;
	}

	public void setUserName(String userName) {
		this.userName = userName;
	}

	public String getPassword() {
		return password;
	}

	public void setPassword(String password) {
		this.password = password;
	}


}
执行前缀msyql
以及加上@Component作为组件 方便其他地方注入
当然这里会提示,
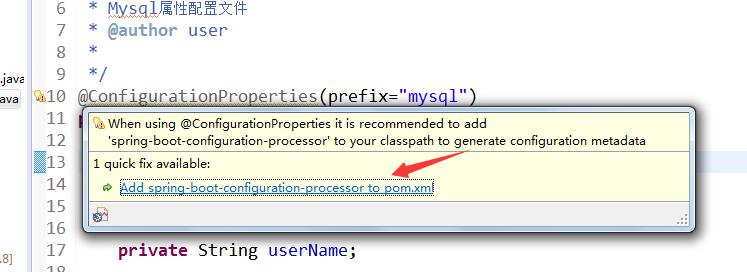
需要引入依赖到pom.xml
我们点下即可

pom.xml里会自动多了一个依赖,自动下载jar包
HelloWorldController里改下
package com.java1234;

import javax.annotation.Resource;

import org.springframework.beans.factory.annotation.Autowired;
import org.springframework.beans.factory.annotation.Value;
import org.springframework.web.bind.annotation.RequestMapping;
import org.springframework.web.bind.annotation.RestController;

@RestController
public class HelloWorldController {

	@Value("${helloWorld}")
	private String helloWorld;

	@Autowired
	private MysqlProperties mysqlProperties;

	@RequestMapping("/hello")
	public String say(){
		return helloWorld;
	}

	@RequestMapping("/showJdbc")
	public String showJdbc(){
		return "mysql.jdbcName:"+mysqlProperties.getJdbcName()+"<br/>"
			  +"mysql.dbUrl:"+mysqlProperties.getDbUrl()+"<br/>"
			  +"mysql.userName:"+mysqlProperties.getUserName()+"<br/>"
			  +"mysql.password:"+mysqlProperties.getPassword();

	}
}
只需要定义MysqlProperties即可 方便很多 运行就不演示了和前面一样;


- Java核心基础(145)
- Mysql(2)
- Docker(35)
- Dubbo(7)
- 007项目(0)
- SVN(22)
- QQ第三方登录(6)
- mybatis-plus(20)
- Mycat(30)
- Layui(2)
- 微信扫码登录(4)
- Git(50)
- SpringCloud(33)
- Tomcat(6)
- 支付宝接口(3)
- NodeJs(1)
- IDEA(24)
- SpringBoot(11)
- Nginx(24)
- Vue.js(50)
- jsoup(6)
- shiro(1)
- hibernate(1)
- EhCache缓存框架(4)
- webservice(10)
- CAS单点登录(7)
- elasticsearch(31)
- Redis(17)
- maven(6)
- 活动(20)
- centos(25)
- log4j日志(8)
- IT之路(26)
- activiti(26)
- 随心生活(19)
- java爬虫技术(14)
- 网站SEO(2)
- httpclient(7)
- htmlunit(10)
- 2026年01月(1)
- 2021年10月(1)
- 2021年02月(3)
- 2020年11月(3)
- 2020年10月(4)
- 2020年09月(7)
- 2020年08月(18)
- 2020年07月(21)
- 2020年06月(37)
- 2020年05月(17)
- 2020年04月(12)
- 2020年03月(10)
- 2020年02月(14)
- 2020年01月(12)
- 2019年12月(15)
- 2019年11月(27)
- 2019年10月(5)
- 2019年09月(1)
- 2019年08月(4)
- 2019年07月(28)
- 2019年06月(16)
- 2019年05月(4)
- 2019年04月(3)
- 2019年03月(2)
- 2019年02月(7)
- 2019年01月(20)
- 2018年12月(2)
- 2018年11月(5)
- 2018年10月(30)
- 2018年09月(11)
- 2018年08月(5)
- 2018年07月(9)
- 2018年06月(4)
- 2018年05月(4)
- 2018年04月(3)
- 2018年03月(7)
- 2018年02月(6)
- 2018年01月(13)
- 2017年12月(3)
- 2017年11月(10)
- 2017年10月(1)
- 2017年09月(9)
- 2017年08月(12)
- 2017年07月(19)
- 2017年06月(21)
- 2017年05月(1)
- 2017年04月(12)
- 2017年03月(13)
- 2017年02月(12)
- 2017年01月(14)
- 2016年12月(8)
- 2016年11月(25)
- 2016年10月(16)
- 2016年09月(13)
- 2016年08月(20)
- 2016年07月(12)
- 2016年06月(36)
- 2016年05月(10)
- 2016年04月(19)
- 2016年03月(14)
- 2016年02月(23)
- 2016年01月(1)