Mybatis-plus HelloWorld实现
我们基于开发主流开发 IDEA,以及主流框架SpringBoot来实现 Mybatis-plus Hellowolrd实现;
后面我们Mybatis-plus统一简称MP框架;
我们通过继承MP提供的BaseMapper通用接口,来实现下查询表数据,来体验下MP框架的强大;
我们首先建下springboot项目,
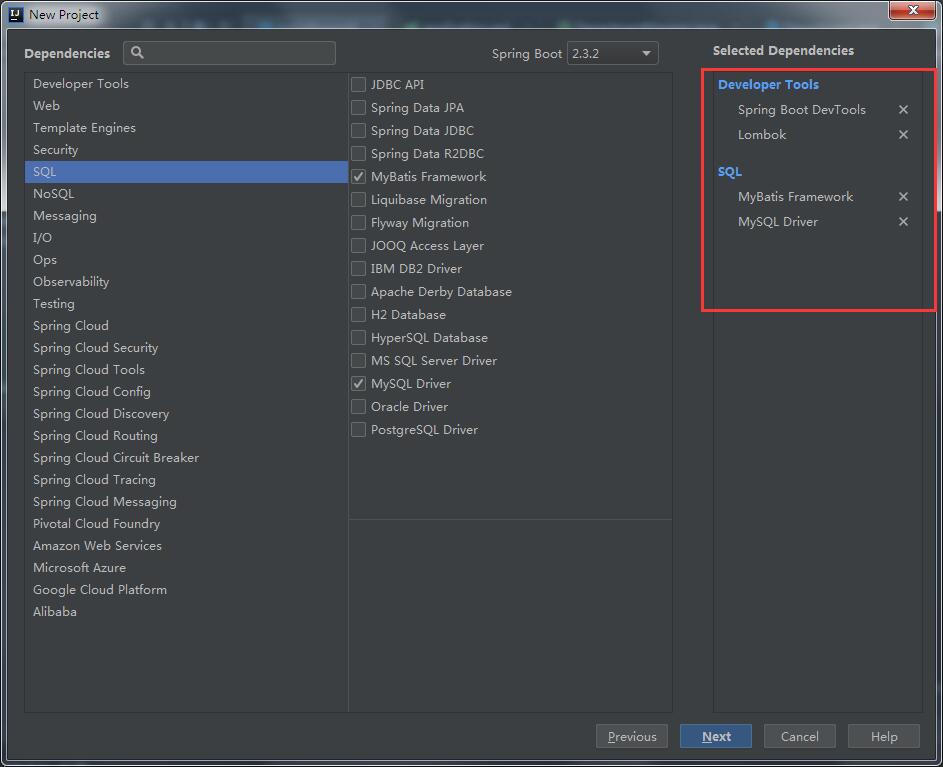
我们引入devtools,Lombok,Mybatis框架,以及mysql驱动,还有其他需要用到的,我们单独引入;

引入下mp依赖,
<dependency>
    <groupId>com.baomidou</groupId>
    <artifactId>mybatis-plus-boot-starter</artifactId>
    <version>3.3.2</version>
</dependency>
再引入下连接池druid和单元测试框架junit
<dependency>
    <groupId>com.alibaba</groupId>
    <artifactId>druid</artifactId>
    <version>1.1.10</version>
</dependency>
<dependency>
    <groupId>junit</groupId>
    <artifactId>junit</artifactId>
    <scope>test</scope>
</dependency>
数据库表和数据准备:
我们搞一个部门表和员工表来测试mp;
数据库名可以是:db_mp
部门表
CREATE TABLE `t_department` (
  `id` int(11) NOT NULL AUTO_INCREMENT,
  `name` varchar(50) DEFAULT NULL,
  `remark` varchar(1000) DEFAULT NULL,
  PRIMARY KEY (`id`)
) ENGINE=InnoDB AUTO_INCREMENT=5 DEFAULT CHARSET=utf8;
部门表数据:
insert into `t_department`(`id`,`name`,`remark`) values (1,'技术部','撸码部门'),(2,'市场部','妹子忽悠客户'),(3,'人事部','抓人头部门'),(4,'财务部','收钱和发工资的');
员工表:
CREATE TABLE `t_employee` (
  `id` int(11) NOT NULL AUTO_INCREMENT,
  `name` varchar(50) DEFAULT NULL,
  `birthday` date DEFAULT NULL,
  `gender` varchar(10) DEFAULT NULL,
  `email` varchar(100) DEFAULT NULL,
  `phoneNumber` varchar(20) DEFAULT NULL,
  `departmentId` int(11) DEFAULT NULL,
  PRIMARY KEY (`id`),
  KEY `departmentId` (`departmentId`),
  CONSTRAINT `t_employee_ibfk_1` FOREIGN KEY (`departmentId`) REFERENCES `t_department` (`id`)
) ENGINE=InnoDB AUTO_INCREMENT=7 DEFAULT CHARSET=utf8;
员工表数据:
insert into `t_employee`(`id`,`name`,`birthday`,`gender`,`email`,`phoneNumber`,`departmentId`) values (1,'张三','2000-01-09','男','3243243@qq.com','13654556578',1),(2,'李四','1993-02-09','男','32421143@qq.com','13622556578',1),(3,'李小丽','1993-02-09','女','11221143@qq.com','12722556578',2),(4,'王小萌','1994-02-09','女','43431143@qq.com','12622556578',2),(5,'曹小梅','1994-04-09','女','21231143@qq.com','12342556578',3),(6,'钱小小','1994-06-09','女','3232143@qq.com','16642556578',4);
项目里我们用application.yml
配置如下:
spring:
datasource:
type: com.alibaba.druid.pool.DruidDataSource
driver-class-name: com.mysql.cj.jdbc.Driver
url: jdbc:mysql://localhost:3306/db_mp?serverTimezone=GMT
username: root
password: 123456
新建部门实体:Department
package com.java1234.entity;

import com.baomidou.mybatisplus.annotation.TableName;
import lombok.Data;

/**
 * 部门实体
 * @author java1234_小锋
 * @site www.java1234.com
 * @company Java知识分享网
 * @create 2020-08-09 17:25
 */
@TableName("t_department")
@Data
public class Department {

    private Integer id; // 编号

    private String name; // 名称

    private String remark; // 备注

}
编写接口DepartmentMapper,继承MP提供的BaseMapper
package com.java1234.mapper;

import com.baomidou.mybatisplus.core.mapper.BaseMapper;
import com.java1234.entity.Department;

/**
 * @author java1234_小锋
 * @site www.java1234.com
 * @company Java知识分享网
 * @create 2020-08-09 17:42
 */
public interface DepartmentMapper extends BaseMapper<Department> {
}
接下来启动类里也需要加一个mapper扫描配置:@MapperScan("com.java1234.mapper")
package com.java1234;

import org.mybatis.spring.annotation.MapperScan;
import org.springframework.boot.SpringApplication;
import org.springframework.boot.autoconfigure.SpringBootApplication;

@SpringBootApplication
@MapperScan("com.java1234.mapper")
public class MphelloworldApplication {

    public static void main(String[] args) {
        SpringApplication.run(MphelloworldApplication.class, args);
    }

}
写一个测试类测试下:
package com.java1234;

import com.java1234.entity.Department;
import com.java1234.mapper.DepartmentMapper;
import org.junit.Test;
import org.junit.runner.RunWith;
import org.springframework.beans.factory.annotation.Autowired;
import org.springframework.boot.test.context.SpringBootTest;
import org.springframework.test.context.junit4.SpringRunner;

import java.util.List;

/**
 * 部门测试
 * @author java1234_小锋
 * @site www.java1234.com
 * @company Java知识分享网
 * @create 2020-08-09 17:46
 */
@RunWith(SpringRunner.class)
@SpringBootTest
public class DepartmentTest {

    @Autowired
    private DepartmentMapper departmentMapper;

    @Test
    public void select(){
        List<Department> departmentList = departmentMapper.selectList(null);
        for(Department department:departmentList){
            System.out.println(department);
        }
    }


}
备注:@RunWith(SpringRunner.class) 加了之后,spring容器才会注入依赖;否则mapper,service都会注入失败;
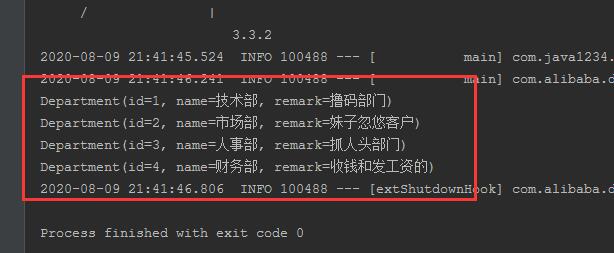
运行select方法:


- Java核心基础(145)
- QQ第三方登录(6)
- mybatis-plus(20)
- Mycat(30)
- Layui(2)
- Mysql(2)
- Docker(35)
- Dubbo(7)
- 007项目(0)
- SVN(22)
- NodeJs(1)
- IDEA(24)
- SpringBoot(11)
- 微信扫码登录(4)
- Git(50)
- SpringCloud(33)
- Tomcat(6)
- 支付宝接口(3)
- jsoup(6)
- shiro(1)
- Nginx(24)
- Vue.js(50)
- 活动(20)
- hibernate(1)
- EhCache缓存框架(4)
- webservice(10)
- CAS单点登录(7)
- elasticsearch(31)
- Redis(17)
- maven(6)
- log4j日志(8)
- IT之路(26)
- activiti(26)
- centos(25)
- 随心生活(19)
- java爬虫技术(14)
- 网站SEO(2)
- httpclient(7)
- htmlunit(10)
- 2022年12月(1)
- 2021年10月(1)
- 2021年02月(3)
- 2020年11月(3)
- 2020年10月(4)
- 2020年09月(7)
- 2020年08月(18)
- 2020年07月(21)
- 2020年06月(37)
- 2020年05月(17)
- 2020年04月(12)
- 2020年03月(10)
- 2020年02月(14)
- 2020年01月(12)
- 2019年12月(15)
- 2019年11月(27)
- 2019年10月(5)
- 2019年09月(1)
- 2019年08月(4)
- 2019年07月(28)
- 2019年06月(16)
- 2019年05月(4)
- 2019年04月(3)
- 2019年03月(2)
- 2019年02月(7)
- 2019年01月(20)
- 2018年12月(2)
- 2018年11月(5)
- 2018年10月(30)
- 2018年09月(11)
- 2018年08月(5)
- 2018年07月(9)
- 2018年06月(4)
- 2018年05月(4)
- 2018年04月(3)
- 2018年03月(7)
- 2018年02月(6)
- 2018年01月(13)
- 2017年12月(3)
- 2017年11月(10)
- 2017年10月(1)
- 2017年09月(9)
- 2017年08月(12)
- 2017年07月(19)
- 2017年06月(21)
- 2017年05月(1)
- 2017年04月(12)
- 2017年03月(13)
- 2017年02月(12)
- 2017年01月(14)
- 2016年12月(8)
- 2016年11月(25)
- 2016年10月(16)
- 2016年09月(13)
- 2016年08月(20)
- 2016年07月(12)
- 2016年06月(36)
- 2016年05月(10)
- 2016年04月(19)
- 2016年03月(14)
- 2016年02月(23)
- 2016年01月(1)